Happy New Year!
I am always looking for a better, faster, more streamlined way of doing things. Lately, I’ve been wanting to make fast, I mean really fast, sites. We build, or help build, a lot of websites for our clients. Sometimes they are massive upgrades to a CMS like Sitecore or Magento, but often times using WordPress is sufficient for their needs.
While I appreciate WordPress for it’s ease of use, and plug & play style, it is lacking in in some areas that are important in a professional environment. The openness of the platform allows for plugins and themes to be created and promoted with no real programming standards. WordPress out of the box isn’t exactly multi-developer, multi-environment friendly. But then I found Roots.
The Ultimate Professional WordPress Stack
There are a couple of things I should point out before continuing. Roots should not be your first WordPress theme. While it uses the WordPress core, it changes a lot of things. You should also take into account this is a stripped down theme. You start off with a HTML5 Boilerplate and Bootstrap. There’s not a lot of “features” added to the theme, which makes starting out easier on development. You’re going to have to add your own design and features to get it looking the way you want. But any professional design starting with a clean and fast framework is better than trusting the theme you bought for $30 off of a random website.
I am a big fan of speed and a clean design, and that’s the first thing I noticed when looking at the Roots WordPress theme. Not only is it responsive ready with Bootstrap, Grunt and Bower are available within the theme. I’ll touch on these more later, but for now, know that Grunt will compile all of your JavaScript and CSS into a single file and minify them for you. Keeping server requests down for assets like this will definitely help site speed; and Roots makes that easy on you.
The other half of the Roots site is their WordPress stack Bedrock. From using the dependency manager Composer, automating deployments, and managing your different environments, Bedrock severely upgrades the working relationship between your team and WordPress.
Getting Started
I am going to skip the environment and deployment part for now and begin with just getting a fast, blank, responsive design setup quickly. I will also assume you have a basic understanding of WordPress and Apache. I also won’t walk you through installing and setting up some of the tools we use in this process. There are enough tutorials on the web to get you started (especially on the sites you download them from). If you get stuck, feel free to ask for help in the comments.
I started by checking out their bedrock install to get the full WordPress environment started. You can follow the process, or scroll all the way to the bottom of this post to check out the WordPress install & theme I used to score 100 on Google’s PageSpeed test. It’s essentially a fork of Roots with a few minor tweaks for speed and making Bootstrap default within the theme.
Things you will need/be using:
- Local development LAMP stack (I set my environment up on a micro instance on an Amazon EC2 so I could test it with the Google PageSpeed)
- composer
- Grunt
- node.js
From a command line, first run:
composer create-project roots/bedrock <path>
Where <path> is a directory. I used /var/www/wp_pagespeed
Answer “Generate salts and append to .env file?” with a “y”.
Configure the virtual host in Apache as normal, and point the DocumentRoot path to the web folder.
DocumentRoot “/var/www/wp_pagespeed/web”
The next step is to configure your database environment. I created a database in MySQL called “wp_pagespeed”. Then opened the /var/www/wp_pagespeed/.env file, and configured my database setup as well as environment variables.
DB_NAME=database_name
DB_USER=database_user
DB_PASSWORD=database_password
DB_HOST=database_host

WP_ENV=development
WP_HOME=http://example.com
WP_SITEURL=http://example.com/wp
Set the WP_HOME and WP_SITEURL domains to match the domain you configured in Apache. The options for WP_ENV are development, staging, and production. Since I am testing how fast the site is, I set it to production.
When everything is configured correctly in Apache, try and load the site with the “ServerName” you configured in Apache. You should get a screen like this:
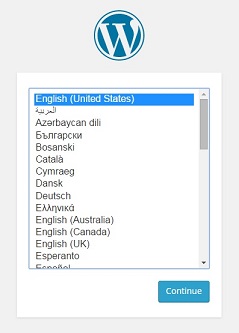
Step through this quick WordPress install wizard to get your fresh WordPress install.
Adding a Theme
We’ve got WordPress setup, but now we need to start with the default Roots theme. I downloaded the theme from here and added it to my /var/www/wp_pagespeed/web/app/themes folder. You can leave the roots folder name, or change it to whatever you want. I left it as roots for our test.
Setting up Grunt
Roots has a short tutorial and webcast that are worthwhile if you’ve never used Grunt. From the app/themes/roots directory, I ran:
npm install -g grunt-cli
If you get an error during this process, please check the above link. Most likely, you don’t have node.js installed.
Now run:
npm install
Per the roots instructions, it will install all the necessary package dependencies. You should see a new roots/assets/vendor folder with some requirements, including Bootstrap. If you are fine using LESS for all of your CSS, feel free to move on, but I prefer SASS, so I added an additional step.
Adding Bootstrap SASS
I used this package to add SASS Bootstrap setup. In order to get this configured properly in our Roots install, I ran the following command in the theme folder:
bower install bootstrap-sass-official --save
You now have the official Bootstrap SASS port in your assets/vendor folder.
Updating package.json for SASS
In the devDependencies section, remove grunt-contrib-less and replace it with this line:
"grunt-contrib-sass": "~v0.8.1",
Then run
npm update --save
npm install
Updating the Gruntfile.js
Since we’ve made the change from LESS to SASS, we need to have our Gruntfile reflect these changes. For instance, here is my new jsFileList
var jsFileList = [
  'assets/vendor/bootstrap-sass-official/assets/javascripts/bootstrap/transition.js',
  'assets/vendor/bootstrap-sass-official/assets/javascripts/bootstrap/alert.js',
  'assets/vendor/bootstrap-sass-official/assets/javascripts/bootstrap/button.js',
  'assets/vendor/bootstrap-sass-official/assets/javascripts/bootstrap/carousel.js',
  'assets/vendor/bootstrap-sass-official/assets/javascripts/bootstrap/collapse.js',
  'assets/vendor/bootstrap-sass-official/assets/javascripts/bootstrap/dropdown.js',
  'assets/vendor/bootstrap-sass-official/assets/javascripts/bootstrap/modal.js',
  'assets/vendor/bootstrap-sass-official/assets/javascripts/bootstrap/tooltip.js',
  'assets/vendor/bootstrap-sass-official/assets/javascripts/bootstrap/popover.js',
  'assets/vendor/bootstrap-sass-official/assets/javascripts/bootstrap/scrollspy.js',
  'assets/vendor/bootstrap-sass-official/assets/javascripts/bootstrap/tab.js',
  'assets/vendor/bootstrap-sass-official/assets/javascripts/bootstrap/affix.js',
  'assets/js/plugins/*.js',
  'assets/js/_*.js'
];
I also removed the LESS section in the grunt file, and added this for SASS
sass: {
  dev: {
    options: {
      style: 'expanded',
      compass: true,
      // SASS source map
      // To disable, set sourcemap to false
      // https://github.com/gruntjs/grunt-contrib-sass#sourcemap
      sourcemap: false
    },
    files: {
      'assets/css/main.css': [
        'assets/sass/main.scss'
      ]
    }
  },
  build: {
    options: {
      style: 'compressed',
      compass: true,
      // SASS source map
      // To disable, set sourcemap to false
      // https://github.com/gruntjs/grunt-contrib-sass#sourcemap
      sourcemap: false
    },
    files: {
      'assets/css/main.min.css': [
        'assets/sass/main.scss'
      ]
    }
  }
},
Then make sure you change the watch section from LESS to SASS as well.
watch: {
      sass: {
        files: [
          'assets/sass/*.scss',
          'assets/sass/**/*.scss'
        ],
        tasks: ['sass:dev', 'autoprefixer:dev']
      },
      ...
      ...
And finally, change the grunt tasks at the end to look like this (changing less to sass):
// Register tasks
  grunt.registerTask('default', [
    'dev'
  ]);
  grunt.registerTask('dev', [
    'jshint',
    'sass:dev',
    'autoprefixer:dev',
    'concat'
  ]);
  grunt.registerTask('build', [
    'jshint',
    'sass:build',
    'autoprefixer:build',
    'uglify',
    'modernizr',
    'version'
  ]);
Within the roots/assets folder, create a new sass folder. You can setup your SASS directory and config however you like, but this is the simple setup I created to get started.
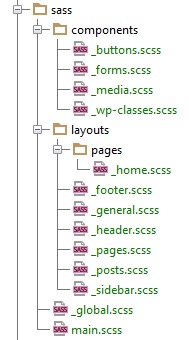
And this is the contents of the main.scss file:
// Bootstrap
@import "../vendor/bootstrap-sass-official/assets/stylesheets/_bootstrap.scss";

@import "_global.scss";              // Base styling & custom mixins
@import "components/_buttons";       // Button tweaks
@import "components/_forms";         // Form tweaks
@import "components/_media";         // WordPress media
@import "components/_wp-classes";    // WordPress generated classes
@import "layouts/_general";          // General styling
@import "layouts/_header";           // Header styling
@import "layouts/_sidebar";          // Sidebar styling
@import "layouts/_footer";           // Footer styling
@import "layouts/_pages";            // Page styling
@import "layouts/pages/_home";       // Home page styling
@import "layouts/_posts";            // Post styling
Now we should have all of our Bootstrap JavaScript and SASS ready to run. So let’s run grunt.
grunt build
In case you haven’t done it yet, switch your WordPress theme over to this new Roots starter theme in the admin. And try loading the new home page.
If you look at the HTML source you will notice that all of your JavaScript has been concatenated together and minified in this file (including all of the Bootstrap JS):
app/themes/roots/assets/js/scripts.min.js
Making sure all of your custom code is together and minified will help speed up your site immediately! Just remember, everytime you make changes to JavaScript, or add a new JavaScript file, you need to run the grunt build command again (or grunt dev if your environment is set to development). If you add new custom JS files, add them in the jsFileList array in your Gruntfile.js.
Also take a look at your new CSS file:
app/themes/roots/assets/css/main.min.css
All the Bootstrap CSS and any styling rules you places in your new SCSS files are all concatenated and minified together in one file as well! Again, we’re speeding up load times (as well as organizing our code) to benefit the user as well as the developers working together on your site.
Testing with Google PageSpeed (Locally)
If you installed this in a public environment where their online page speed tool can reach it, go ahead and use that. Otherwise, install this Chrome extension to test your local install.
Testing a local install, I noticed I had overlooked a couple things. These are the errors the PageSpeed extension warned me about:
- Enable compression
- Leverage browser caching
- Specify a Vary: Accept-Encoding header
Enable Compression
This part is easy. Make sure these modules are enabled in your httpd.conf
LoadModule deflate_module modules/mod_deflate.so
LoadModule headers_module modules/mod_headers.so
LoadModule filter_module modules/mod_filter.so
And add the following config in your httpd.conf, Virtual Host, or .htaccess file.
<IfModule mod_deflate.c>
AddOutputFilterByType DEFLATE text/text text/html text/plain text/xml text/css application/x-javascript application/javascript
</IfModule>
This also fixed my specify a Vary: Accept-Encoding header.
Leverage Browser Caching
The only file PageSpeed was complaining about was the modernizr.min.js file. So an expiration date was not set for this file. Make sure mod_expires is enabled:
LoadModule expires_module modules/mod_expires.so
And then set a configuration for multiple file types with this config in the .htaccess.
## EXPIRES CACHING ##
<IfModule mod_expires.c>
ExpiresActive On
ExpiresByType image/jpg "access 1 year"
ExpiresByType image/jpeg "access 1 year"
ExpiresByType image/gif "access 1 year"
ExpiresByType image/png "access 1 year"
ExpiresByType text/css "access 1 month"
ExpiresByType text/html "access 1 month"
ExpiresByType application/pdf "access 1 month"
ExpiresByType text/x-javascript "access 1 month"
ExpiresByType application/x-shockwave-flash "access 1 month"
ExpiresByType image/x-icon "access 1 year"
ExpiresDefault "access 1 month"
</IfModule>
## EXPIRES CACHING ##
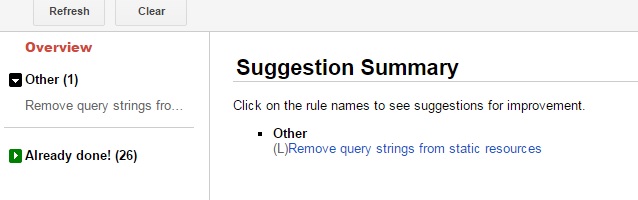
After restarting Apache and reloading the page, all those errors are gone. Now PageSpeed complains about query string parameters in static resources. These parameters are in place so when you update the styling and run a new ‘grunt build’ command, a new query string parameter is generated so the server knows to load new static files. So for now, we’ll leave these in place. But we’ve got a great start!
Testing with Google PageSpeed (Public Host)
I really wanted to create a good baseline install that can be reused when creating new sites. For a public test, I decided to spin up an Amazon EC2 micro instance. Using the install we have setup above, our intial score was Mobile 85 and Desktop 95.
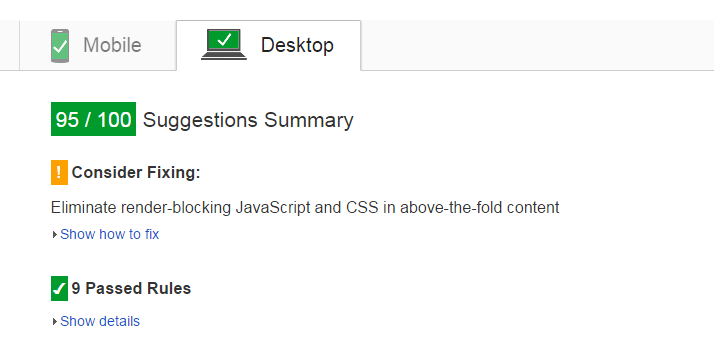
There’s only one thing holding us back. The main.min.css file. Google recommends we load only CSS necessary above the fold in the head section, and push the rest of the CSS into the footer for faster loading. That is the next challenge I will tackle and update this post accordingly. But for now, we’ve got a great start! Too often I see websites start with failing grades, and lots of hacks to try and get the score up higher. It’s much better to start with something really fast, and build on top of that framework to keep speeds at an appropriate level.
Download this WordPress Setup & Theme
As I progress towards the fastest setup we can achieve on Google PageSpeed, I will make all of this code available on Github. If you prefer to just checkout this code and test it yourself, or use it for an upcoming build, you can find our fork of their code here.
Or even easier! Just run this command:
php composer.phar create-project rankhammer/bedrock /var/www/yourpath
And make sure your /var/www/yourpath points to wherever you want your new WordPress install to be created. After that, create your MySQL database, and update your .env file to hold all the connection information.
So for now, that’s it! I hope this is helpful to you, and if you have any questions or suggestions, please use the comment section below. The people over on the Roots site are very good at what they do, and extremely helpful. If you have any questions about developing a theme with Roots, feel free to ask them as well too.